DISCLOSURE: This post may contain affiliate links, meaning when you click the links and make a purchase, we receive a commission.
For a lot of people building a SAN on the cheap would be a dream come true. Building a SAN on your own is not that difficult. But the problem is that if you want to build one for cheap, it is not quite possible typically. Because the prices of the components related to SAN/iSCSI are very higher.
And, if you are going to build one for cheap then most of the time you would have problems. This is why we have come up with this article for you. In this post, you will find the method of building a SAN. And, we will also share some tips and tricks using which you can save a good amount of your money.
So let’s dive in…
Building a Cheap Homemade SAN
What is SAN?
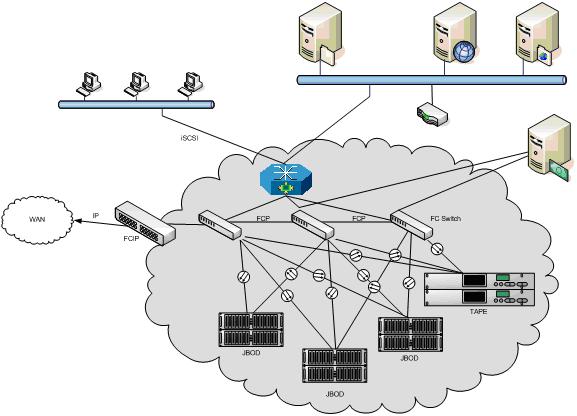
The word ‘SAN’ stands for ‘Storage Area Networks’. SAN is a local network of storage devices that connect the servers, storage devices and any other devices in that particular network. It is a Block-based storage technology. So, with the help of this technology, you can put all of your storage drives at one place and connect them with multiple servers and can access to them from any other devices/programs that are connected to that specific network.
Prior to building our SAN, we need to have a clear idea about the components, configurations, and specifications of it. Now, we will discuss this.
Our requirements:
You can build your SAN your way. However, in our case, we have considered a number of things before building ours. Here are some of the things we wanted to do with the SAN. First, we need it for around 16 TB of media collection of our home lab. Next, we would want to use this as a backup target for all of the VMs of our home lab server. Aside from all that, we will use it for more tasks like these.
So, it is clear that we would need a hefty amount of RAM for RAM caching. Another concern for us was to have an ECC memory compatible motherboard. Typically most of the consumer level motherboards don’t support ECC RAMs. Yet after a lot of searching, we have found out some good options. But, you have to understand that the prices of those motherboards are expensive. Along with that, the ECC memories are also highly priced.
The next problem was the case. Although there are very advanced hot swappable cases are available. Those are again pretty expensive. So, we needed to take another route. We searched and found a 4U case which is capable of fitting fifteen 3.5″ storage drives. It also has a lot of other awesome features. We will talk about it later.
Next, we would need a hardware RAID card. We have gone for a PCI express x8 hardware RAID card. However, we need to mention that this is a SATA II card. This has not raised any issues yet. Rather the performance is quite good. Moreover, the card comes with RAID migration and online capacity expansion features. This has helped us in a lot of ways.
When it comes to Hard Drives, you can go with your favorite brand. In our case, we have chosen the Hitachi Ultrastar drives. To be noted, the WD Green hard drives are not very Hardware RAID friendly. So, we would suggest you avoid them. In total, we would have 2 TB x 16 Hard Drives. Thus, the total storage capacity would be 32 TB for now.
For the network connectivity, we have used the reliable Quad gigabit PCI-e card from Intel (Intel Pro/1000).
By this time, you know about the requirements or the build goal for our SAN. So, we can proceed to the part where we pick out the hardware.
Components lists for the cheap SAN:

In this section, we will reveal the list of the hardware of the SAN we are going to build. So, before we do that, we should tell you that there are numerous ways to build a SAN. So, your one won’t have to have similar hardware like ours. Yet, if you insist on making one similar to ours, there is no problem. But, we would suggest you to go get your own.
Another thing is that the components we are going to use here might not be available for some of you. So, it is better if you get any other company’s which are compatible with the entire build. No need to copy the entire build part by part.
The list:
- CPU: FX-6100 from AMD, 6 Core CPU
- Mobo (Motherboard): 970 Extreme 3 from ASRock (AMD)
- ECC RAM: the above mentioned Mobo is compatible with ECC RAM
- RAM: 32 GB, DDR3-1600, from Crucial Ballistix Sport
- Case: 4U server case RSV-L4500 from Rosewill, 15-Bay Server case
- Power Supply Unit: 750W modular power supply from Corsair; HX 750
- OS Drive: SSD- 128 GB from Crucial, Model- M4
- SAN/iSCSI Software: SAN/iSCSI from Starwind (Free Edition)
- RAID Card: ‘LSI MegaRAID 84016E’
- RAID Hard Drives: Hitachi Ultrastar 2TB x 16; 7200RPM
- SCSI Highly Available Node Drive: SSD- 128 GB from Crucial, Model- M4
Now, we will explain the reasons for picking these parts in the next section. So that you can get a plain idea about our motive behind our build.
About the Motherboard:
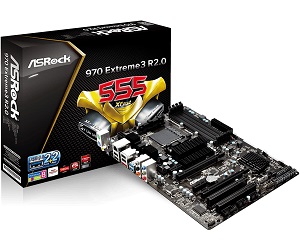
For this build, we needed a motherboard which supports ECC RAMs. You know that there is not a lot of consumer level motherboard which is ECC compatible. However, we have found out that the 970 Extreme 3 AM3+ from ASRock is perfect and compatible with ECC RAMs.
Added to that, the motherboard is very reasonably priced as it is an AMD product. This one comes with 2 PCIe x16 slots, 1 PCI-e slot, 2 PCI slots, SATA 3 ports, 4 DRAM slots and so on. So, you can see that we can use a RAID card and also a gigabit NIC card simultaneously using the PCI-e x16 slots.
Also, we can use SSD for the operating system using the SATA 3 ports. And, as it comes with 4 RAM slots, we can have 32 GB RAM in total (8GB×4). That’s great. We like this motherboard so much that we have used this one in another one of our ‘AMD white box’ server builds.
About the Case:
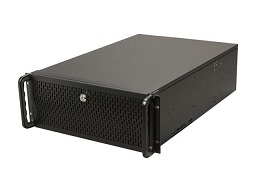
First off, you might already know that the hot-swappable SAN cases are very expensive. And, there are a lot of options to choose from as well. However, as we want to build a SAN for about $1500, we should not go for those cases. So we have gone for a great alternative which is — RSV-L4500 from Rosewill a 4U case.
The main reason for choosing this one is that it has 15 drive bays (3.5″). Yes, 15 hard drive bays. As we will be using sixteen 2TB hard drives, this is the best choice. The case comes with 8 fans in total. You will have 3 in the front (120 mm), 2 in the back (120 mm), and 3 in between the motherboard and the hard drives (120 mm). So, you can be sure that your build will be cool. Additionally, the noise level of those fans is also not that high.
Another cool feature of this case is that the hard drive bays are tool-less. You can swap the hard drives with just your bare hands. Lastly, the only problem with this case is that it doesn’t support hot-swap. And, believe it or not, that feature is not that essential for us. So, we are happy with this case.
About the RAM:
As our motherboard comes with 4 slots for RAM, we have gone for four 8 GB sticks. So, in total, we are getting 32 GB of RAM. In this build, we are using Crucial Ballistix DDR3-1600 bus speed RAMs. You can get the RAM from any other brand. But we have found these RAMs for cheap, so we have gone with these.
Check Image: Crucial Ballistix
Among the 32 GB RAM, we will be using 28 GB for the RAM cache. And the rest of the 4 GB RAM would be used by the operating system itself. As our build is not for a production environment, this amount of RAM would be enough for now.
About the Processor:
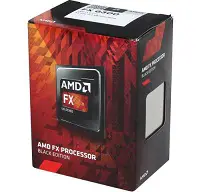
Here’s a little tip for you, it is better to have a CPU for SAN with more cores but with a lower clock rate than a CPU with higher clock rate but with fewer cores. So, we have chosen a CPU with 6 core which is the AMD FX-6300.
You can go with Intel processors as well. But for our build, we have seen that AMD has a better option for us than Intel. And, the price range of Intel is also higher than AMD’s. So, if you want to go with Intel CPU, you can but remember to get a CPU which has more cores.
About the ECC Memory:
ECC memory or Error-correcting Code memory is an advanced type of data storage which can detect and as well as correct most of the prevalent internal data corruption. Thus it is recommended to use ECC memory on SANs.
Check Image: ECC Memory
Although, memory corruption is very rare. And, many people including us don’t use them. So, if you want to be extra secure then you can use ECC memory. However, you should know that it would increase the cost of your SAN.
About the OS Drive:
For our OS, we have used a 128 GB SSD from Crucial. If you want you can use any other SSDs or even you can use HDDs too. However, we would recommend using SSD over HDD.
Check Image: The OS Drive
And, especially for the OS, you must try to use SSD. On some occasions, you will get about 20 times better performance using SSDs over HDDs.
About the Power Supply Unit:
Seriously, you should never cheap out on the power supply unit. If you do, your whole system can blow out in an instant. So, we are using the Corsair HX750. This is one of the best options out there. It has 12 SATA power connectors, and it is Gold certified. However, to use 16 hard drives, you would need 3 Molex to dual SATA connectors.
Check Image: Corsair Gold PSU
Plus, it is a semi-modular power supply unit. Only the 8 Pin CPU and the 24 pin motherboard connectors are fixed. Other than that, everything is modular. So, it is very easy to cable manage inside the case. Furthermore, if the power supply runs below its 50% load, the fans of the PSU won’t run. We really like this power supply.
About the SAN RAID card:
For this, we are going with the ‘LSI MegaRAID 84016E’. You might know that for most of modern data centers, these are outdated. However, they actually perform very well indeed. That means that these are perfect for a home lab.
Check Image: RAID Card
There are a lot of features of this RAID card. For instance, it supports RAID 0, 1, 5, 6, 10, 50, and even 60. In our case, we will be using RAID 6. You can run them in a PCI-e x8 interface. They also have 256 MB built-in RAM.
If you are lucky, you might also get a deal with the cables and a battery backup unit. The only problem with this RAID card is that it supports up to 2 Terabyte drives. So, if you are using RAID 6 like us, then you will have 28 TB of usable storage space. However, in case, you use the RAID0, you can have the 32 TB storage space usable.
About the NIC card:
When it comes to NIC cards, it is better to go for more. We mean, if it’s possible to use a 4 port gigabit card then use that. This will help you to channel out the data over different networks at once. Thus, we are using the Intel Pro 1000 Gb NIC card (QUAD). This card needs a PCI-e slot to run.
Check Image: 4 port NIC card
There are other options too. For instance, you can use fiber NIC cards. But those are expensive and for us, quad gigabit NIC card is more than enough. So, we wouldn’t be worried about using a fiber NIC card.
About the SAN RAID Hard Drives:
You can go with any Hard Drives of your choice. We have gone with the Hitachi Ultrastar SATA Drives. We have bought sixteen 2 TB hard drive for our build. These drives have 7200 RPM.
Check Image: Hitachi HDD
The MTBF of this HDD drive is at 2 million. So, you can rely on them. We are using Hitachi Ultrastar for a long time. And, we like them for their performance.
About RAM Cache:
This is optional. If you want a faster operation, then you should use RAM caching. There are a number of ‘RAM caching’ software out there. And we have found out that a software named ‘PrimoCache’ is a great one for this purpose.
Check Image: The RAM cache
It works as a RAM cache in between your operating system and the storage drives. It usually caches the data on a block level. So, it can be used for both physical and even virtual drives.
As we have 32 GB RAM, we can use a good amount of RAM for caching. For instance, we will be using 28 GB for caching purpose, and the other 4GB would be left for the system. You can certainly use any other software for this.
You can also use the ‘Starwind iSCSI SAN’ software which also offers this feature. But the free version comes with a limitation. That is you can’t cache more than 512 MB of RAM per iSCSI device. If you want to lift the limitation, you can use the paid version.
About the Build:
Setting up the build is easy. You just need to be patient about it. If you want to cable manage then you will need more time. It is better to cable manage, though.
After you have set up the hardware inside the case, you can start the process of installing the operating system. Then install the essential software on your system.
The next part is to create the RAID volume. It will take a lot of times (at least 10 hrs.). The last step would be to install the Starwind iSCSI SAN & configure it. The total set up would take more than 24 hours.
Check out the Images:
Now, we will be sharing some of the images of the build as well as we will also provide you with screenshots of a few benchmarks and software. Here they are:
- The case of the DIY SAN
- Rosewill Case Accessories
- Corsair HX series PSU
- PSU Connectors
- Motherboard with the RAM
- The Front Panel of the SAN
- Another view of the front panel
- Top view of the SAN
- The view of the drive bays
- The view of the motherboard
- The view from the side
- The view of the RAID Drives
- Another view of the Mobo
- The rear view of the build
- The SAN on the Rack
- The view of the network stack
- RAID Benchmark without RAM Cache
- Screenshots of the System Properties
- RAID Benchmark with RAM cache
- Screenshots of the network connections
- RAID Array screenshot
- The screenshot of the Core Temp soft
The Final Words:
The hardware we have used in this build can be bought for about $1500. For most of us, this is a lot. But unfortunately, when you want to build a high-quality SAN, you will need to spend more than usual.
Because the prices of the required components are very high. However, if you want to save then you should use eBay and look for deals here and there. We have also used the same method to get the components for a lot cheaper than their normal price.
One of the drawbacks of this process is that you need to wait for a while to find a good value deal. But it is better to be patient to save some bucks whenever it’s possible. And we definitely recommend you to wait. On the other hand, if you have the budget then you can start buying the components and build your dream homemade SAN.
Reference: Donald Fountain, TheHomeServerBlog