Azure VM Sizing Calculator
Estimate Azure-style VM family fit, vCPU and RAM ratio, data disk count, IOPS, NIC throughput, workload tier, capacity buffer, and HA pair sizing for capacity planning.
⚙️Azure-Style Workload Presets
🖥️Workload Inputs
📊Capacity Signals
🗂️Azure VM Family Comparison Grid
| Family | Best Fit | Typical RAM/vCPU Signal | Disk/NIC Planning Signal |
|---|---|---|---|
| B-series | Light services, dev tools, bursty admin hosts | Low to balanced memory, CPU credit sensitive | Keep steady CPU low and avoid heavy disk queues |
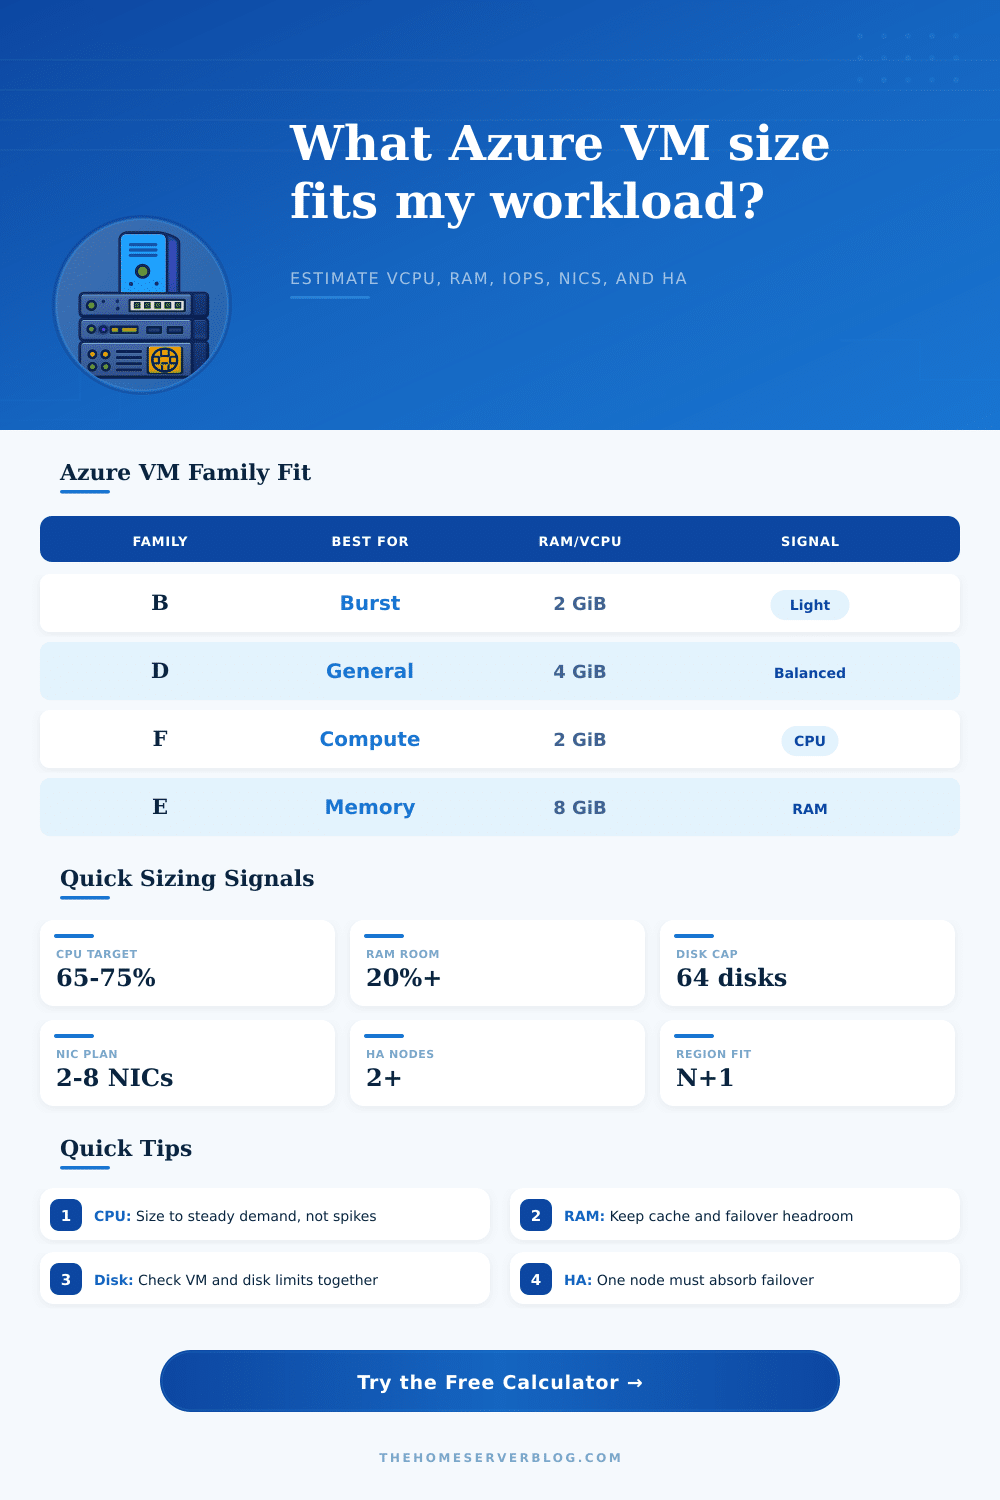
| D-series | General purpose apps, APIs, domain services | Balanced around 4 GiB per vCPU | Good baseline for moderate disks and network |
| F-series | Compute workers, batch jobs, front-end CPU tasks | Lower memory per vCPU, CPU weighted | Watch RAM pressure before scaling cores |
| E-series | Databases, caches, search nodes, JVM services | High memory around 8 GiB per vCPU | Often pairs with higher disk and NIC limits |
| M-series | Very large in-memory databases and SAP scale-up | Very high memory density | Use when RAM dominates all other signals |
| L-series | Storage-heavy nodes, NoSQL, indexing, data landing | Memory varies by generation | Storage optimized signal for disk-heavy workloads |
| N-series | GPU compute, visualization, inferencing | Driven by GPU model and VRAM needs | Check GPU, CPU, memory, and NIC together |
💾Disk and Network Reference
| Planning Area | Calculator Input | Capacity Check | Practical Sizing Note |
|---|---|---|---|
| Data disks | Disk count | Count must fit VM family limits | More disks can raise aggregate IOPS when the VM limit also allows it |
| Disk IOPS | IOPS per disk | Disk total and VM cap both matter | Stripe only when the application can use parallel IO safely |
| Disk throughput | MB/s per disk | Throughput can bottleneck before IOPS | Backups, scans, and analytics are throughput sensitive |
| NIC throughput | Gbps app traffic | Compare app traffic with VM network envelope | Replication and backup windows should be counted separately |
| HA failover | Node count | Remaining nodes must carry failed node demand | N+1 works only when each survivor has enough headroom |
🧮Common Azure-Style Workload Sizes
| Preset | Family Bias | Starting Shape | Capacity Driver |
|---|---|---|---|
| Dev/Test Sandbox | B or D | 2 to 4 vCPU, 8 to 16 GiB | Burst CPU and light disk IO |
| Zone Web Front End | D or F | 4 to 8 vCPU, 16 to 32 GiB | CPU headroom and NIC throughput |
| SQL OLTP Node | E or M | 8 to 32 vCPU, 64 to 512 GiB | Memory cache, IOPS, and failover |
| Analytics Worker | F, E, or L | 16 to 64 vCPU, 64 to 512 GiB | CPU, throughput, and scratch IO |
| AVD Session Host | D or E | 8 to 32 vCPU, 32 to 256 GiB | User density and RAM per session |
📐Capacity Rule Table
| Rule | Metric View | Imperial View | How This Calculator Uses It |
|---|---|---|---|
| CPU envelope | vCPU at target utilization | Same compute unit | Demand divided by target utilization, then buffered |
| Memory envelope | GiB RAM with growth | GiB RAM with growth | Greater of entered RAM or vCPU ratio target |
| Storage IO | IOPS and MB/s | IOPS and MB/s | Disk count multiplied by per-disk requirement |
| Network IO | Gbps throughput | Gbps throughput | Application traffic plus tier and HA overhead |
| HA capacity | N+1 node survival | N+1 node survival | Checks whether survivors can absorb one failed node |
💡Sizing Tips
When you are required to provide an Azure virtual machine, you must determine the size that will most best meet the demands of your workload. A workload include requirements for CPU, memory, storage, and network traffic. If you dont properly balance these requirement for your workload, your Azure virtual machine may become underpowered during peak hour.
To help calculate the appropriate size for your Azure virtual machine, Microsoft provide sizing calculators. The sizing calculator begins with determining the CPU demand for your workload. To calculate the CPU demands for your workload, you must determine the number of CPU core that your application use and the percentage of CPU utilization that you require for your workload.
How to choose the right size for an Azure virtual machine
A lower percentage for CPU utilization will provide extra capacity for your workload but will make the Azure virtual machine use its CPU resource less efficient. An higher percentage for CPU utilization will use the Azure virtual machine’s CPU resources more efficient but create a risk that the workload will compete for the same CPU resources. The tier that you select for your Azure virtual machine will automatically determine the percentage of CPU utilization that is recommend.
The memory that your Azure virtual machine must have consists of the amount of RAM that it must have and the ratio of the amount of memory to the number of CPU core. You can input the amount of RAM that your workload require. However, the sizing calculator also require you to determine the memory to CPU core ratio.
Some workload will require more memory than they will require CPU power. By entering a high memory-to-CPU core ratio into the sizing calculator, it will recommend that you use an Azure virtual machine with high memory performance. By entering a low memory-to-CPU core ratio in the sizing calculator, it will recommend that you use a general-purpose or CPU-optimized Azure virtual machine.
The memory-to-CPU core ratio indicate the sizing calculator which component of your workload will grow. For storage sizing, you must determine the size of the individual disk that your workload will use and the limits for the aggregate amount of storage device for that Azure virtual machine family. While many Azure virtual machine will focus on the number of disks that will be used and the Input/Output Operations Per Second (IOPS) for those disk, the limits for aggregate device are the most important sizing calculation.
The sizing calculator will multiply the number of IOPS for each disk by the number of disk that you want to deploy and compare that number to the limits for aggregate device for that Azure virtual machine family. If the number of IOPS per disk times the number of disk exceeds the limits for aggregate device, this will create a bottleneck in your Azure virtual machine deployment. The same logic apply to network throughput requirements for your Azure virtual machine.
The sizing calculator will calculate the amount of network traffic that your application will generate and add the network traffic requirements for the tier and high availability setting for your Azure virtual machine. This calculation will ensure that the Azure virtual machine can handle the network data that it must move. High availability mean using two or more Azure virtual machine node for your workload so that if one node fail, the other node will handle the work of that failed node.
For high availability, the sizing calculator must determine whether or not the surviving node have the remaining spare capacity to handle the load of the failed node. The sizing calculator will not simply calculate the requirements of your workload and multiply that requirement by the number of node that you are using for high availability. Each node for a high availability solution must have the spare capacity to handle the load of any failed node.
High availability calculation will reveal the size of an Azure virtual machine for a single node may be too small for high availability to effectively use that node’s spare capacity. The sizing table provide a detailed view of each Azure virtual machine family and the limits of that virtual machine family. The limits for each Azure virtual machine family are encode into the type of Azure virtual machine family.
For example, an Azure virtual machine family with a limited amount of memory will have a higher limit for the number of CPU core than an Azure virtual machine family with a limited amount of CPU power. The sizing calculator will use these limit to recommend an Azure virtual machine family for your workload. The sizing calculator may recommend using a memory-optimized Azure virtual machine family even when your CPU demand are low because the memory-optimized Azure virtual machine family has the capacity to meet the memory demand of your workload.
The sizing calculator include two allowance to protect your Azure virtual machine from problems outside of your workload. The growth allowance allow your Azure virtual machine to handle the slow growth of new feature and user. The region buffer allow for the possibility that some Azure virtual machine size may not be available in every data center.
These two allowance will increase the size of your Azure virtual machine recommendation. In most instance, it is better to choose an Azure virtual machine that is too large for your current workload than to choose an Azure virtual machine that will eventually require resizing. However, resizing an Azure virtual machine later on will be significantly more expensive than providing an Azure virtual machine with too much capacity when provisioning the virtual machine.
To ensure that you have correctly selected the size of your Azure virtual machine, you can use a simple habit when provisioning your Azure virtual machine. This habit involve running the sizing calculator to determine the suggested Azure virtual machine family, then ensuring that the suggested Azure virtual machine satisfy your requirement for high availability and storage limit. If the suggested Azure virtual machine satisfy these requirement, it is a defensible size for your workload.
If the suggested Azure virtual machine does not satisfy these requirement, you must adjust one or more of the sizing calculator’s input and run the sizing calculator again. The sizing calculator does not make the decision of what size of Azure virtual machine to deploy for your workload. Rather, it makes the tradeoffs for your workload visible to you so that you can make an informed decision about the size of your Azure virtual machine.